Spark Plug Reading - Gas Engines - 4 Stroke
We do our best to write clear and concise tech articles and as we get feedback from you, the enthusiast, we update and rewrite articles or sections to make them more decisive and easy to understand. It costs us hard earned dollars to maintain this site and keep this information free for all. Most of our calls are not for product we have sold, we don't mind at all as many of you already know we're always happy to assist where our competitors fail.
FBO Ignition no longer offers spark plug readings over the phone or email, please use this information as a reference.
Additional tuning information available in our Tuning to Win book. Click Here
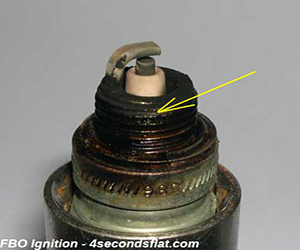
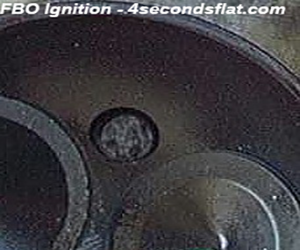
Example #1:
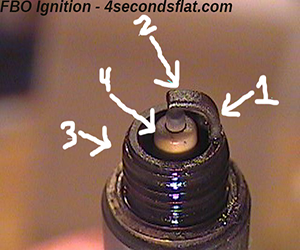
Lets analyze this plug, sorry the numbered points aren't clear but it's 1-4, you can figure it out.
#1 Is a timing indicator, you'll see a definite color change on the ground strap, it doesn't show well here but you can still see it right about at the arrow. Too much timing and the color change will be very close to the threaded body of the plug, too little and it'll be closer to the tip. Ideally we want it right in the apex or center of the 90 bend on the ground strap. This plug shows too much timing for the combustion chamber efficiency or octane level.
#4 Arrow shows another indicator of timing, you'll usually see a brown ring right at the tip of the porcelain area it should be a sharp and defined ring about .020 wide. Wider indicates not enough timing and any smaller, or only 1/2 way around or nonexistent as in this image is the second indication of too much timing in the motor.
#2 The tip of the ground strap is loaded with OIL deposits, fuel deposits are usually flat black in color and almost like a fine powdery deposit, this motor is leaking oil into the combustion chamber, bad valve guides, leaking valve covers allowing oil to seep through the plug threads, whatever it needs to be fixed.
#3 The threaded portion of the plug gives you the heat range, look at the threads you'll see that a few toward the tip are a dull burnt looking color the rest are black and shiny. You want about 2 threads showing the heat on the end of the plug and the rest of the threads to be shiny, this plug is impossible to read because of the oil mess. If you using a longer reach plug than this one 2.5 to 3 threads is optimum.
To increase the number of burnt threads increase the heat range of the plug, if you have 4-5-6 threads burnt you need to get a colder plug.
Looking at the color of the porcelain I'd give this carb a passing grade at the mid range and not to bad on the idle circuits although that dam oil leak makes it tough to really get a good read. I'll get some better shots for example 2.
Example #2:
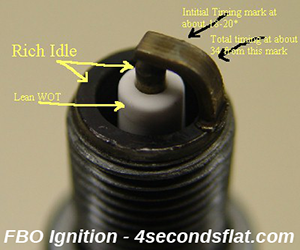
The plug is showing me by the deposits on the tip of the electrode and also the deposits right on the edge of the threaded body, that it's slightly fat at idle.
The white porcelain is showing a lean condition at WOT, it's not too far advanced as the total timing mark or color change is right in the apex of the ground strap curve. The Idle timing is shown by the triangular hazing up on the flat of the ground strap and without even looking at the distributor specs I can tell you that the timing on this SB Mopar is about 18-20 initial and 34 total.
I would need a better picture of the threads to determine the heat range.
Changes:
* I would try and lean it out just a touch at idle and up the jets by 2 points to fatten up the WOT circuit.
That slightly lighter color at the tip of the ground strap indicates too much gap, nothing serious but next time you change plugs I'd go to about a .036 gap from the current .040. Too much resistance caused by too wide of a plug gap can cause excessive heat on the tip which will shorten the life of the plug and really give you no benefits. I believe excessive plug gaps are not required on most Muscle and bracket cars, once you get into real big compression and major power you would open up the gap and replace plugs 2-3-4 times a year.
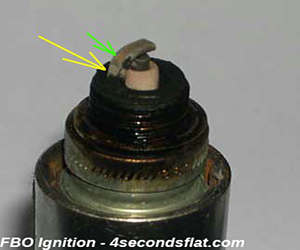
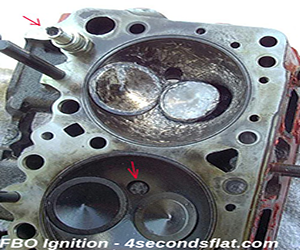
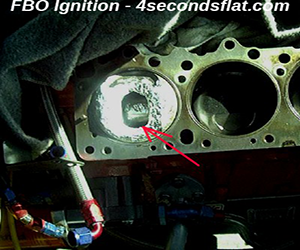
Example #3:
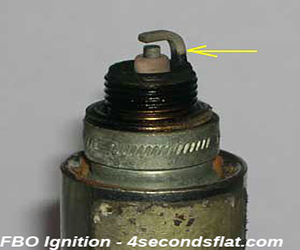
Let's look at Image 1.
Note the change of color on the ground strap and it's position, this shows a timing issue. Unfortunately the reader who sent this image in didn't say what engine he was working on but by the condition of the plug I would guess a Small Block Chevy, 3 years old with 38* total timing and an Edelbrock Carb......
In the second image I used a green arrow to show the area where we want the timing mark to be on this engine and of course you can see that the motor has too much timing.
Image 3 shows only one thread heated on the plug and rest are oil soaked and wet this normally indicates that the plug is too cold, the oil indicates a valve cover leak and a New set of Cometic Aramid fiber gaskets would cure it.
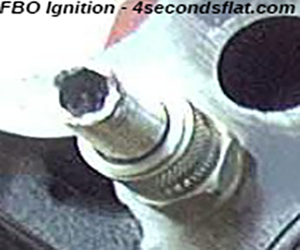
Example #4:

The color on the plug indicates a decent idle A/F ratio and a good ignition system probably an MSD or some other type of aftermarket ignition. The hot spark is keeping the porcelain clean on the top area anyhow. Now if we look down into the bottom of the plug as seen in the above image where the porcelain reaches below the steel body we see black deposits indicating a rich condition at mid range to WOT. I would guess this engine is a little lazy in mid range and could get better mileage.
Changes:
* Back off the total timing but keep whatever the initial is as it appears pretty good, I would shorten the total by 4* and do another check.
* Fix the oil leak
* Go up one heat range and after about 50 miles check to see if you have 2-3 threads heated up and discolored for correct heat range.
Heating up the plug will help reduce the carbon build up and further tuning with the A/F ratios can be done.
Example #5:
This is what you don't want...
This is Bob Riggle's Hurst Hemi Under Glass motor after a pass. A little too much timing and or not enough fuel.
Note the spark plugs completely melted.
The piston detonated itself into fragments and beat the combustion chamber to a pulp... his day was done.
WOT Race Tuning
Install an E.G.T Gauge in the header this is a inexpensive and easy way to know what is happening inside your combustion chamber. Ignition timing and A/F ratio's are critical to achieving optimum performance without going to far and falling off the edge into detonation while still not being so rich as to not reach maximum power potential. Without data logging this is legal for NHRA Pro bracket racers.
The best way to tune for W.O.T is by doing a shut down at the end of the track and doing a proper W.O.T reading on the plugs,
which is explained in my book. Click Here
Accurate measurement of the combustion chamber temperature is the only way to achieve the perfect tune up. A combination of a O2 Sensor with a data logging feature combined with accurate and rapid responding E.G.T Gauges will achieve the quickest and most accurate track tuning. Dynos are OK for a baseline setting, NO DYNO will ever replace a good track tuner with the right tools.
Look at it this way....
Why spend $500-$800 at the Dyno shop where all conditions are determined by the dyno operator and climatic conditions of the ambient air on the particular day of the test. You now take your engine home and bolt it into a car with a transmission, engine compartment heat, different fuel, fuel pressure variances, G forces, tire slip, wheel stands, elevation and etc. All your money did was set a baseline which can easily be done in your own shop with a screwdriver. So unless you feel the need to have a piece of paper that tells you how much power your motor can make with too much timing and too much fuel save your money, spend $20.00 on our book, read it and start experimenting to achieve the best performance and consistency possible.
If you must spend that money spend it on a WEGO, 5 wire, wide band, data logging O2 sensor, it'll last for years and give you accurate combustion chamber efficiency from the burn-out box to the freeway. Team that up with a Stewart Warner E.G.T (Exhaust Gas Temp gauge) and it won't matter if it's 105* or 55* outside, 300' or 5,000' elevation you'll be able to make decisive changes with no guess work or risk to your investment.
If your tuning a Pro Stock or NASCAR engine then you need a Dyno, if it's a street/bracket car then buy our $20.00 book, study it and go to work at the track.
If your interested in a American Made WEGO A/F system
The Air/Fuel Map
Look at the porcelain and divide it into 3 areas, top, middle and bottom in about 1/3rds.
Top Area:
This area is your idle circuit and for the racer real has very little meaning. However if your car is a street driven vehicle then we need to attempt to get this portion to a dark gray/tan color by tuning the A.F.R with the Air Bleeds and the four corner Idle adjustments until we get a clean crisp idle and total combustion of the fuel at idle. Keep in mind that the idle circuits are totally isolated from the rest of the carburetor and can be tuned with very minimal affect on the W.O.T position A/F Ratio.
Center Area:
This is the area that will show the combustion chamber condition at part throttle or cruise with the power valve and secondary venturi's closed. Usually about 30-50 MPH depending on the gear and weight of the car.
Bottom Area:
This is where the racer needs to concentrate all his efforts, using a 5x or 10x scope you need to look right down to the bottom of the porcelain where it meets the metal housing of the plug. This is the area that will leave the color that you need to study and tune to. The other 2/3rds of the porcelain will be burned clean by the high heat generated by W.O.T and high R.P.M, this is not the time to read for cruise or Idle characteristics.
We're looking for a colored ring right at the base of that porcelain which I refer to as a Fuel Ring. The color will vary depending on the type of fuel your burning, Unleaded Pump gas will leave very little color because of all the additives such as injector cleaners and methanol. Most of us run a 108 or 110 in our bracket cars and these fuels will leave a tan color while the C17 and higher octane fuels will leave an almost gray fuel ring. If you study the ring you will see that it starts to show color just below the base of the ground strap, this is caused by the shielding affect of the strap leaving that portion cooler thus showing the most color. The ring will develop from each side and form a full circle of correct color as you get closer and closer to the correct tune up. If you look down into the bottom of the porcelain and you detect a thin oily deposit you are seeing oil from the combustion chamber caused by either worn or improperly seated rings, you may also detect this with a new engine that hasn't fully seated the rings yet, just don't confuse this with the "Fuel Ring".
Plug Characteristics
Shiny or Glazed Porcelain:
This occurs for two reasons, excessive idling or rich idle condition leaving heavy soot deposits. These deposits will burn and create excessive porcelain temps causing the glass to melt usually resulting in a down track popping through the exhaust. You will usually see splotchy deposits on the plugs after the run, either green or yellow in color and of course the tell tale shiny glaze. This glazing of the porcelain actually becomes a conductor and the spark will jump from the electrode to the porcelain resulting is a very weak small if any spark. The porcelain should always have a chalky or dull finish.
Base of threads sooty:
This is usually a indication of the plug not being tight enough allowing it allow air to pulled in to the chamber and fuel being pushed out, change the plug, tighten to spec. This area should have a nice dark to medium gray color without heavy deposits.
Black or brown specs:
This is an indication of detonation usually caused by too hot of a plug, drop one or two heat ranges and it should go away. The plug gets so hot that it will start to detonate the fuel before the ignition fires, this cause a double flame front and reduces the efficiency of the combustion process as these two flame fronts battle each other in the combustion chamber. The black spots are the result of the fuel deposits being burned onto the porcelain by the double flame front. Once you cool down the plug and remove the secondary ignition source you can re-set your timing to produce the correct combustion chamber temp for optimum power.
I've heard 100's of so called tuners and engine builders tell people that this is normal and nothing to worry about......WRONG. Do not underestimate the damage that this condition can do to your engine, drop the plug heat range.
Shiny little diamond like deposits:
It's too late you've already started to blow the pistons out of it. Start over from scratch, fatten the carb, back-up the timing and cool down the plugs. Now start a proper tuning procedure and hopefully you caught it before too much damage was done.
No color mark on ground strap:
If your showing good color on the porcelain but the ground strap fails to show an indicator then your plug is too cold, go up 1 heat range.
If the ground strap is showing a good color line but the porcelain is showing no color at the base then your plug may be too hot, drop down a range. I will use maybe 3 different ranges on one bank, make a pass and from those three different plugs determine which one is correct for the engine.
Variable heat readings:
On a small block motor most have adjoining exhaust ports, these will always be your hottest cylinders and in some cases where there has been excessive port work and thinning of the metal between the ports it may be necessary to run a plug one step cooler in those cylinders, use a plug indexing washer to back the timing down in those cylinders slightly, or if you have an adjustable ignition system you may want to electronically back the timing down in the hot cylinders.
Always tune to MPH and not ET:
There are too many variables on the ET side of the time slip, tire slip, lane choice, driver error, tire pressure etc. If you use the MPH most of these variables are eliminated, learn more about track tuning in the Book.
Tire Pressure:
This is off the topic but I want you to think about this critical aspect of Bracket racing and consistency.
I always see guys adjusting their tire pressures in the staging lanes just before a pass ...why?
1st pass:
Think about this.....your tire temp is 50* you set it at 8#, you do a big burnout and the tire temp goes to 135* the pressure picks up to 9.5#. Learn more about our winning theory on tire pressures in our Book.
2nd Pass:
So you go back to the lanes and you wait for an hour, the sun comes out and your tire temp is now at 75* .....It's all in the book
3rd pass:
Now it's noon and the ambient air is at 90*, you check your tire and its at 8.25 so you deflate it even more..........
All these variables are discussed in the book.
The theory being that your making your pass with a tire temp of 135*, so why set your tire pressure when it's at 70*?